Intro
Like most pixel art inventions, tiles are a product of limitation. Back in the day when computers had very little memory, developers were able to cleverly fill the screen with animated graphics by breaking everything into small square images that can be repeated and seamlessly fit together in various combinations. Constructed in a grid, these small squares are referred to as tiles for obvious reasons. Tiles can not only greatly reduce memory costs, but also the time it takes to create art for levels. Additionally, the precise structure of tile-based environments provides a logical base to map gameplay onto. When done well, tiles create a consistent aesthetic that marries perfectly with pixel art. Even with the powerful computers and art creation tools of today, the tradition of tile-based graphics remains strong.
This is the first of several lessons that build upon each other as I create the assets for a cohesive top down game world. In this lesson I focus on several different 16x16px tiles from a top down 3/4 projection. I think this is a good place to start with tile making, as the small tiles can be edited easily, and complete scenes can be made without a need for background tiles.
While tile-based graphics may be described as an economical approach, don’t let that fool you into thinking it’s easy to make tiles. Tile making is a precise art form that requires supreme attention to detail. Although part of the charming aesthetic can be attributed to repetition, you don’t want the tiles to be too obvious. The trick is in trying to hide the patterns within consistent non-distracting textures.
Grass Tiles
The good ol’ grass tile. This is where the grand journey begins. It may appear simple, but a perfectly balanced grass pattern that looks good tiled over a large area is difficult to achieve in so few pixels.
Ultimately, a grass texture made up of only one tile becomes monotonous, no matter how awesome the tile is. I find it works well to mix in spaces of flat green with textured areas of differing vegetation density, which can create visually pleasing gradations. The variation feels natural, while the negative space helps reduce noise and lets the environment breath. Don’t forget occasional flower variants to add a splash of life.

Dirt Tiles
Where there is grass there is surely dirt. Let’s dig in!

Most likely you’ll want to combine grass and dirt tiles. In that case, it’s important to think about what style will mix well with your grass tiles. Dry and cracked, muddy slop, flat clay; dirt comes in many different consistencies and colors. It doesn’t hurt to consider the geology of your environment.
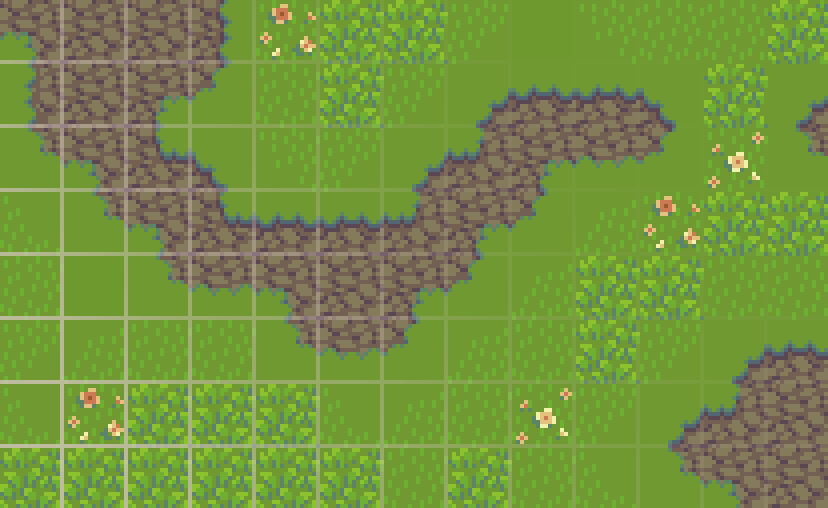
Connection Tiles
Now we are going to gracefully merge the grass and dirt tiles into a set of connection tiles. I bet you can hardly contain your excitement!
I decided to combine the dry dirt texture with a simple green grass, as the busy dirt pattern contrasts well with the more airy grass texture. However, there is no right or wrong. Play around with different combinations of textures and style of grass edging. Once you have grass tiles, dirt tiles, and a set of connection tiles, the real fun of arranging the tiles into level maps can begin! Well, it’s still a bit simple for a game level, but at least you can create an interesting base ground to begin building a world on. More to come in the next lesson!
Key points
Balance - Strive to achieve a homogenous distribution of visual weight within a tile. If any area of the tile has a visual dominance the pattern will become too obvious. Include clusters that overlap the edges and loop around the tile to help hide the seems.
Consistency - Define key clusters and shapes and repeat them in several cases to create a pleasing consistency. Avoid touching key clusters with other key clusters, as they clump into different irregular clusters and create noise. Touching corner to corner is okay.
Limit colors - You only need a few colors to make a rich texture. Too many colors and the texture will become blurry. Also, strong contrasting colors in the case of a texture pattern may result in displeasing noise.
Contrast - Consider contrast when combining different textures in the same environment. A busy texture next to another busy texture may exhaust the eyes with too much noise. Negative space is your friend.
Reflect - Often tiles can simply be mirrored to create tiles of different orientation. This saves time, and the symmetry creates a pleasing consistent look.
Resolution - You can make tiles any size you want, but the larger the more laborious. Anything over 32x32px seems like overkill for pixel art. 16x16px is probably the most common size and is sure to do your pixels justice.
Software
In order to proficiently make tiles, it’s essential that you can see how the seems are connecting in real time. Some software lacks this feature, while some does it better than others. Here’s a bit of info on making tiles in the programs I’m familiar with.
Pyxel Edit
I purchased this program for the purpose of making tiles, as it’s specifically designed to make the process easier. For the most part it does just that by allowing you to create and save tiles into an atlas, which can then be stamped onto a tile map. You can edit any placed tiles and it will update them all in real time, allowing you to easily refine tiles while building scenes.
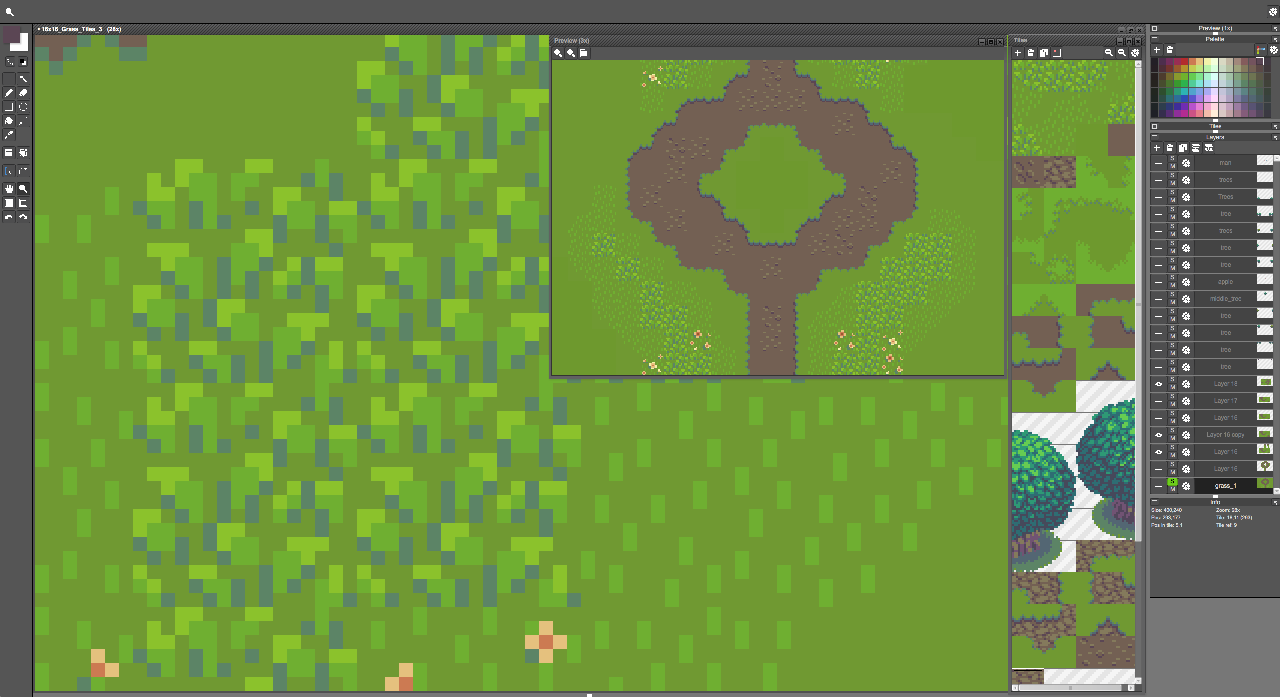
Everything is pretty straight forward and easy to learn with this program, thanks to the clean ui with helpful hover hints. To make a new tile click the + button in the tile window. Place as many of the tile on the canvas as you want with the tile placer tool(a), then draw on any of those tiles and watch them all fill in. Press the tab key to show what tiles are placed where so you don’t lose track of where you placed blank tiles. This is important, as you can also draw freely on any layer without using tiles.
Aseprite
I haven’t used this program much for tiles but it seems to offer a reasonable workflow. A full on tile editor is reported to be in the works. I will definitely give it a spin when it comes out.

For now, the most handy feature is ‘Tiled Mode.’ Start with a small canvas exactly the size of the tile you want to make. Then, turn on ‘Tiled Mode’ under ‘View’ in the menu bar and choose the axis to have the image tiled.
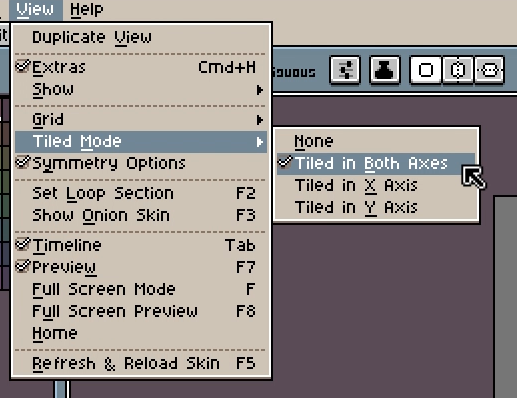

Now you can see how your image tiles and anything you draw will live update in all the cells. Easy peasy tile making in just a few clicks!
Photoshop
I use Photoshop for just about everything, except making tiles. However, if you take the time to customize your setup and implement a few tricks, it becomes a reasonable process.

For general workflow, make each tile on its own layer and organize your finished tiles in a separate project file off to the side, which can then be used as a tile atlas.

The pattern fill function can be useful for tile creation. Select the area you want to turn into a pattern, then choose ‘Define Pattern’ under ‘Edit’ in the menu bar. Name your pattern in the following prompt.

Once you have a pattern saved, select an area on the canvas you want to fill with the pattern, then choose ‘Fill’ under ‘Edit’ in the menu bar.

Choose ‘Pattern’ in the fill options window.

Choose your pattern and select ‘OK.’ Your pattern will then automatically tile itself to fill the area you selected on the canvas.
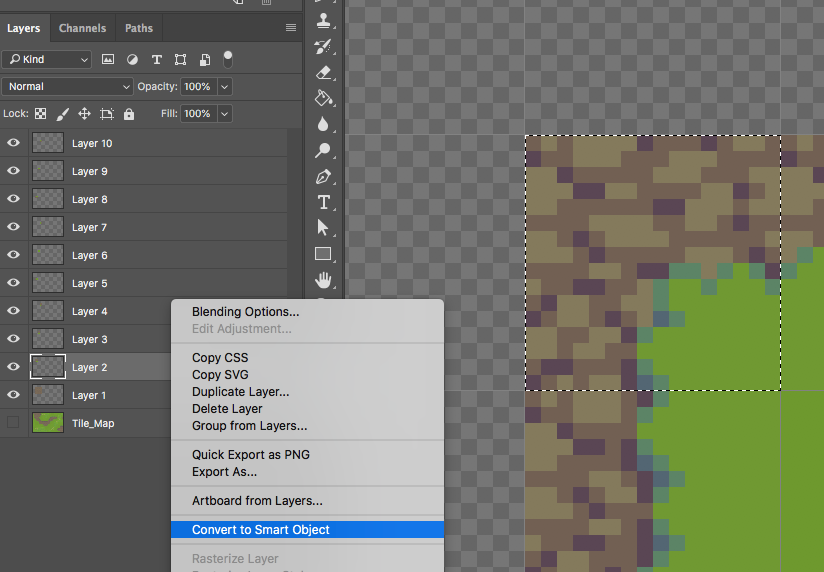
While Photoshop doesn’t have a tiled mode or live update, smart objects provide a close alternative. To make a smart object, right click/control click on a layer and choose ‘Convert to Smart Object.’ In this case there should only be one tile on the layer. You don’t have to make a precise selection around the tile, just select the layer and convert it to a smart object.

After you convert the tile into a smart object you will notice a small document icon on the layer. Double click this icon or right click/control click the layer and choose ‘Edit Contents.’

The tile you converted to a smart object will then open in a separate file. You can now make edits in this window, and as soon as you save it (command S) the changes will appear in your main project that contains the smart object. So it’s almost like a live update, you just have to save every time you want to see the changes.
With any pixel art design and no matter what program you use, it’s very helpful to have a preview window open that displays the scene from a zoomed out view, allowing you to see how it appears from a normal viewing distance while staying focused in on a specific tile/area. Basically, it cuts out the need to constantly zoom in and out.
I normally don’t place much importance on software, but when it comes to tile making it can make all the difference. Personally, I struggled a lot with tiles until I started using Pyxel Edit. However, I only use it for tiles and prefer Photoshop for just about everything else. End the end, use what you got, what you can afford. There’s always a way.
FINAL THOUGHTS
Honestly, this was one of the most challenging tutorials for me to put together, but I’m so glad I did it. Much was learned in the process. I hope these tutorials and tips help you on your way to becoming a tile master. I intend to continue the lesson in the next Pixelblog with more top down environment objects, and eventually create an animated top down character. Stay tuned as I flesh out this world and pass on the knowledge and assets.

Just a tease of what’s to come…
RESOURCES
Was this article helpful? If you find value in my content please consider becoming a Patreon member. Among many other rewards, Pixel Insider members get extra resources to compliment my tutorials. But most importantly, you allow me to continue making new content.
Assets featured in this Pixelblog are available in Top Down RPG Starter Asset Pack
Source files used in the making of this Pixelblog are available in Top Down Grass Dirt Tiles Source Files
Get caught up on all my downloads
If you're not ready to commit to the subscription model of Patreon, make a one-time donation and receive exclusive art and resources. Help continue the content by providing me a living. Thank you!
-By Raymond Schlitter